Showing posts with label gardening tips. Show all posts

Thursday, June 10, 2021

A must know gardening tip - All about using hydrogen peroxide for plants and gardening.


Hydrogen peroxide is common in our first aid kit. But, how many of us are aware that hydrogen peroxide is also common in gardening. Hydrogen peroxide provides immense benefits for plants. We will discuss in detail about how hydrogen peroxide benefits plants, how much hydrogen peroxide is safe for plants,  how to use hydrogen peroxide for plants and many more details.

Hydrogen peroxide for plants


Now, let's see what are the benefits of hydrogen peroxide to plants.


Hydrogen peroxide is very effective in maintaining a healthy root system.It treats root rots.

Apart from this it is used for
1. Hydrogen peroxide actually releases oxygen and provides additional oxygen supply to roots, thus promoting vigorous growth of plants.
2. Pest control
3. As a foliar spray that prevents fungus
4. Pretreating seeds
5. Treating soil fungus
6. Accelerate germination: Soaking the seeds in a weak solution of hydrogen peroxide will enhance sprouting rate immensely.

With so many benefits to plants what is that which exactly makes hydrogen peroxide beneficial to plants?


Similar to water, hydrogen peroxide is also made up of the same atoms of hydrogen and oxygen, except that hydrogen peroxide has one additional atom of oxygen and this is what gives it the beneficial properties.

We might also wonder, if hydrogen peroxide is harmful to plants?


After looking into the make up of hydrogen peroxide, which is very similar to water, hydrogen peroxide is definitely not harmful to plants, provided it is used in diluted quantities. Generaly 3% solution of hydrogen peroxide is the one which is commonly available in stores. They can also go upto 35%. When it comes to gardening purposes, 3% hydrogen peroxide (H2O2) is safe for plants.

The next common question is that, how much hydrogen peroxide should I use for the plants?


To give your plants a good boost of oxygen and to control the pests, dilute 5ml of 3% solution of hydrogen peroxide in 240 ml of water and spray it on the plants. If you want to treat plants with root rot or fungal infections, dilute 15 ml of hydrogen peroxide in 240 ml of water.

If you want to use hydrogen peroxide for a larger area of your garden, then consider using 35% hydrogen peroxide solution and dilute 1 part in 10 parts of water.

Once we know the amount to be used we also have the question, how often should hydrogen peroxide be used for the plants?
We can water the plants with hydrogen peroxide solution once a week and we can also use hydrogen peroxide after it rains.

Monday, June 7, 2021

Rarely known 6 highly effective organic weed control for your summer garden.

Most of the times we tend to pull out the seedlings that grow along with the weeds. This is what I did to my little lettuces that was growing inbetween my onions. We either tend to do this either by mistake or our weeder equipment just pulls out the veggie seedlings as it weeds.

But this information that I am going to share here is what I knew only later, after causing much humiliation to my veggie seedlings in the summer garden. 

Remember these important factors in organic weed control: 

Organic weed control


1. Critical period of harm: Weeds cause harm to your plants only during the critical period, which is 6 to 8 weeks after sowing or transplanting the veggies. It is only this period of competition by the weeds that causes great harm to the yield. Weeds that grow after this period do not affect your plants but, we must be watchful to prevent the formation of seeds. 

Protip: The weeds that you weed out can also be used back in your garden to increase yield of your vegetable plants. Know how.  

2. Sensitivity to root disturbance: This is another major factor that needs to tbe considered while weeding. If your weeding session causes intense harm to your black peas and beans then they might never recover. Also a slight mangling of vines to the cucumber family may cause great harm to the plants. It will prevent the plants from proper ripening. 

Related article: Highly effective homemade fertilizer for your vegetable plants

3. Plants with their own organic weed control system: The vigorous vining of canopy tend to cause a dense canopy effect to the weeds by shading them and thus turns out to be an effective self weed prevention system. Similarly, the dense green ground cover of the stems of sweet potatoes also tend to form their own weed control. 

Know this: Do you notice these common signs in your plant - Be alert.

You can use such plants strategically in your summer garden to prevent weeds organically. For instance, growing canopy forming crops like squash as a weed suppresser in the bed will also help the plants in the adjoining row by extending it's weed control system to the adjoining rows. These canopy forming plants will also help to retain soil moisture.   

Related article: 5 must know gardening idea and gardening hacks

4. Growing leafy greens as weed controller: Leafy green veggies or herbs such as mustard can be grown in between onions and other veggies. These will shade out the weeds that are growing and will prevent them from flourishing in the critical period. Mustard greens tend to grow out as a natural mulch that is great and great to prevent weeds. In addition to shading out weeds, it enhances the soil greatly and reduces soil borne diseases. 

Related article: Homemade fertilizer rich in Nitrogen and Potassium. 

5. Consider nurse crops: Nurse crops are short term crops that can be grown in the summer gap. These will keep your bed or soil engaged during the summer gap and provide organic weed control until you need the space back for your veggie seedlings. Buckwheat and peas can be excellent nurse crops. Once you want to clear the space for seedlings, just pull out these and use them as mulch on your bed. 

Related article: Want to grow huge amounts of potatoes successfully in containers at home - know this. 

6. Use enhanced mulch system: Using news papers as mulch on the soil or your raised bed is a good option as it tends to keep the weeds out much effectively. You can lay a thick layer of newspaper around the plants and then cover it with a layer of common mulch that you use such as, sawdust, grass clippings, wood chips etc. 

Thursday, June 3, 2021

5 Rarely known gardening tips for growing huge quantities of tomatoes

Caring for tomatoes throughout the growing season is highly essential and following these tips will help you maximise the harvest while minimizing effort and work. 

rarely known tomato growing tips

1. Nutrient dense soil - Rich in Phosphorous:

Did you know that tomatoes love nutrient dense soil, especially Phosphorous. Of the NPK fertilizers, Phosphorous is the one that promotes flower and fruit development in addition to sturdy root development. Over feeding tomato plants with Nitrogen fertilizer will promote a lot of  green foliage, but will not encourage flowers and fruits. 

2. pH of the soil matters:

If you are expecting big reaps from your tomato plants, then looking into the soil pH number and maintiang the ideal pH is essential. Maximum nutrient absorption of tomato plant is between 6.2 and 6.5. 

3. Deep and horizontal planting of tomatoes:

Tomato plants unlike other vegetable plants have roots throughout the stem and so, planting the stem deep and horizontal will enhance the growth of the plants, thus increasing yield. 


4. Loosen the roots:

For healthy tomato plants, the roots must be loosened before transplanting it. Most of the time the roots appear entangled and circled inside the container. Before transplanting the plant loosen the root ball and then plant it deep and horizontally. 


5. Always add a companion to your tomato plant:

Never plant tomatoes alone This will increase the pests. A secret tip to reduce pests is to plant them with companion plants such as dill, cilantro, fennell etc.These will provide nectar for the wasps and thus control hornworms that damage tomato plants. Similarly, lowers like alyssum provide nectar for tachnid and syphrid flies which prey on pests such as leaf rooted bugs, whiteflies etc, which harm the tomato plants. 

Tuesday, June 1, 2021

10 beautiful gardening ideas for home

Creating a beautiful garden is a great passion for almost everyone. Gardening tips and gardening ideas for home are always sought out inorder to give that extra great look to our garden. 

Here are 10 sime tips for a beautiful garden. These garden ideas for home will make your garden look awesome. 

Beautiful gardens appeal to our senses. The colours and immense diversity of design combinations, fragrance, flavours, sounds from birds and insects attracted to the plants and variety of textures.

Go for a drive around your neighbourhood and take notice of the gardens that catch your eye or next time you visit a friend’s garden, be observant and tune in to what you love about it. No doubt they will be applying some design principles and elements that apply whether they are used in art, graphics, building, interior or garden design.

“A garden is a thing of beauty and a job forever.” – Richard Briers

Simple concepts can make a HUGE difference to the enjoyment of your garden space and particularly so, when it is a micro garden. Designers use these principles all over the world to make spaces really stand out and visually beautiful. Less really can be more if you know how.


1. Add flowers or flowering plants
Splashes of colour break up green, provide variety, contrast and focal points. Try sowing both annuals and perennial flowers. e.g. cosmos, hydrangeas, sunflowers and marigolds.

You don’t specifically have to plant flowers though. A wide range of herbs and vegetables have beautiful flowers too. These include: chives (purple), spring onions (white), dill (yellow), thyme (pale pink to purple), basils (white or purple), pineapple sage (red), rosemary (purple), rocket (white), as well as all flowering vegetables and fruits.


Monday, May 17, 2021

Plant propagation techniques - How to propagate plants from hardwood cuttings.

Plant propagation is an extremely interesting process for gardeners, as it creates a lush thick look with more plants all free of cost. But, propagating plants successfully has been a challenge to gardeners till date. There are various factors that play a role in successful propagation of plants. But, choosing the right cutting is the most important thing when it comes to propagating plants from  cuttings.  

Here we will see about propagation of plants through hardwood cuttings. The in-depth process of plant propagation techniques using hardwood cuttings has been given here. Following these gardening techniques and gardening  tips will lead to successful growth of new plants from plant cuttings.


Hardwood cuttings are even simpler to prepare than softwood or herbaceous cuttings, as we use cuttings from dormant deciduous trees and woody plants, and this technique is very useful for propagating fruit trees such as figs, pomegranates, mulberries and quince. Some plums can grow well from hardwood cuttings too, while other’s don’t do so well, it depends on the variety.

This technique is also used for propagating vines such as grapes and kiwi fruit, and the currant family – blackcurrants, redcurrants, golden currants and gooseberries.


plant propagation from cutttings


Step by step process to propagate plants from hardwood cuttings.  


Kind of stem cutting to be used for various types of plants:


When it comes to stem cuttings, there are are various types of stem cuttings, and for each plant, the kind of stem cutting that has to be chosen varies. The type of stem cuttings are to be decided based on whether it is a herb, shrub, tree or indoor plant. Also certain stem cuttings are easy to root and thus easy to propagate. Whereas certain stem cuttings such as semi hardwood plant cuttings and hardwood plant cuttings are quiet difficult to root and propagate. They also take a longer tie period to root. 

Herbaceous cuttings are made from non-woody, herbaceous plants such as coleus, chrysanthemums, and dahlia. A 3- to 5-inch piece of stem is cut from the parent plant. The leaves on the lower one-third to one-half of the stem are removed. A high percentage of the cuttings root, and they do so quickly.

Softwood cuttings are prepared from soft, succulent, new growth of woody plants, just as it begins to harden (mature). Shoots are suitable for making softwood cuttings when they can be snapped easily when bent and when they still have a gradation of leaf size (oldest leaves are mature while newest leaves are still small). For most woody plants, this stage occurs in May, June, or July. The soft shoots are quite tender, and extra care must be taken to keep them from drying out. The extra effort pays off, because they root quickly.

Semi-hardwood cuttings are usually prepared from partially mature wood of the current season’s growth, just after a flush of growth. This type of cutting normally is made from mid-July to early fall. The wood is reasonably firm and the leaves of mature size. Many broadleaf evergreen shrubs and some conifers are propagated by this method.

Hardwood cuttings are taken from dormant, mature stems in late fall, winter, or early spring. Plants generally are fully dormant with no obvious signs of active growth. The wood is firm and does not bend easily. Hardwood cuttings are used most often for deciduous shrubs but can be used for many evergreens. Examples of plants propagated at the hardwood stage include forsythia, privet, fig, grape, and spirea.


Here is an in-depth information on which kind of stem cutting has to be taken for the most common plant varieties. 

How to propagate plants successfully like a pro - Gardening tips for Plant propagation.

Propagation has been the most looked out method for multiplying plants as we would like to fill our garden space with beautiful plants in an cost-effective manner.  Multiplying the plants in our garden and balcony, to give that jungle look to our living space, using plant propagation, has also become trending among young gardeners. 

Plant propagation


Moreover, Propagating plants can easily add more plants to either your indoor or outdoor collections. 


There are various methods of plant propagation and propagating plants through cuttings is one of the easiest and cost effective methods. 


When it comes to Growing new plants through plant cuttings, it can either be through stem cuttings, leaf cuttings, or root cuttings


Leaf cuttingsroot cuttings


Now we will see about the process and few plants that can be propagated through stem cuttings. The list will include a mix of indoor and outdoor plants. 


When it comes to stem cuttings the kind of stem can be categorised as 

1. Herbaceous

2. Softwood

3. Semi hardwood

4. Hardwood


Herbaceous stem cuttings:

These are done for herbaceous plants that are non - woody. 


Herbaceous stem cuttings


Herbaceous stem cutting propagation method can be used for Coleus propagation, Chrysanthemum propagation, Philodendron propagation, propagating Impatiens, propagating Poinsettias, wandering Jew propagation and Dahlia propagation. Rosemary cuttings are very easy to propagate. Thyme and mint propagation can also be done from herbaceous stem cuttings. 


Softwood stem cuttings:

These are the soft, succulent, young, stem cuttings from woody plants. These softwood of the plant will snap when bent and will also have leaves that are not yet fully mature. 


The bending test is the best method for finding the right softwood for plant propagation

  • ‌New growth will generally be greenish and will not break easily when bent. 

  • ‌Soft wood will easily break when bent and this is just right for propagation of plants through stem cuttings. ‌

  • Hardwood will not break easily. 


Softwood stem cuttings


Some plants that can be propagated through softwood stem cuttings are, coleus, gardenia, geranium, hibiscus, lilac, salvia, etc. Hydrangea cuttings, lavender cuttings, jade plant cuttings,


Semi hardwood cuttings:

Semi hardwood cuttings are collected from the stem that has grown in that season, but has hardened and matured. 

These stems will have leaves of full size. 

Semi hardwood cuttings take longer to form roots. 

Some plants that can be propagated using semi hardwood cuttings are Coprosma (taupata), camellia, azalea, New Zealand broadleaf (Griselinia), hebe, Fuschia, Leucodendron, boxwood, rhododendron and holly. 


Hardwood cuttings:

Hardwood cuttings are nearly 1 inch in width and are taken from stems that have grown the previous season. They are not easy to break. 


Examples of plants that can be grown from hardwood cuttings are figs, Pomegranates, mulberries, grapes, gooseberries etc. 


Here is the exact process of propagating plants from stem cuttings. 


Thursday, May 13, 2021

Highly effective homemade fertilizer for your vegetable garden - Gardening tips and Gardening ideas.

Mostly your vegetable plants and fruit plants require a wide range of nutrients, and potassium is one of the most important nutrients out of the three major ones. We will see about an easy to make homemade fertilizer that can supply your plants, especially vegetable plants in your terrace garden or balcony garden with high amounts of potassium and also other vital nutrients. 


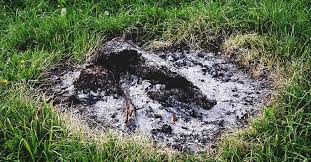
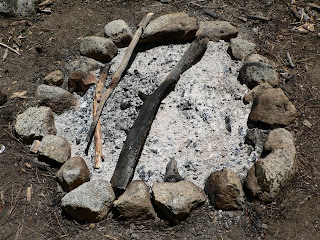
Most of us generally get this fertilizer at home on a daily basis, but tend to neglect it because of not knowing its uses for plants. This is none other than wood ash. Yes, when you burn  wood for any purpose, it leaves out ashes and these ashes are rich sources of nutrients for your plants. 


Wood ash for plants as fertilizer
Uses of wood ash in your garden


Nutrients in wood ash which makes it a good homemade fertilizer for your garden:


Even if you don’t burn wood at home regularly, it is a very good option to burn wood just for the purpose of getting a fertilizer that enhances the flowering and fruiting of your plants. Wood ash contains a good amount of potassium and Phosphorus, which are highly essential for plant growth. Wood ash also contains micronutrients such as calcium, zinc, manganese and iron, which are essential for healthy plant growth. 


Let’s see how to use this wood ash for your plants. There are 3 common ways of using wood ash for your garden. Each one has its own uses. 


1. Using wood ash in compost:

Wood ash  can be mixed with either your kitchen compost or your vermicomposting. If you are using wood ash along with your kitchen compost you can add a thin layer of wood ash for every 6 inches of your compost pile. 


Using wood ash in compost

Uses of wood ash in compost: 

Wood ash is alkaline in nature and thus it tends to reduce the acidity of the compost. Once the acidity is reduced, the worms can easily work on your compost and help it to decompose faster. This kind of compost that is less acidic is very suitable for mulching your vegetable plants in the garden. The compost that is made with adding wood ash to it is also richer than the general kitchen compost as they have the worm decomposed nutrients in it. 

2. Using wood ash directly in your garden soil:

Most of the vegetable plants generally require a soil pH of about 6.5 to 7.0, if your soil is below 6.5, then it is highly recommended to add wood ash to the soil directly as it would balance the soil’s nature. Moreover, if you use lot’s of cattle manure in your garden soil, then it is highly useful to add wood ash, because cattle manure tends to make the soil acidic. 


You can also add wood ash in your potting mix when you are potting a new plant or while repotting.  


Using wood ash in garden soil


3. Adding wood ash around the plants:

Plants such as cabbage, Brussels and fruit bushes that love alkaline soil can be given a side dressing with wood ash. This also prevents club root formation in plants which is mostly common in acidic soil. 


Using wood ash as fertilizer around plants


Caution - if using wood ash: 

Wood ash is not to be used for acid loving plants such as berries and potatoes, especially, blueberries and raspberries need acidic soil for maximum growth and production. 


Wednesday, May 12, 2021

Do you notice these common signs in your plant - BE ALERT - Gardening tips and Gardening ideas.

Plant nutrients and it's importance: 

Plants, just like us need nutrients and having great interest in gardening, we would have definitely tried out different fertilizers. We will now see about what nutrients plants actually need and in addition to this we will also see when is the right time to provide the plant nutrients. 

Importance of noting various signs in plants, to identify the kind of nutrient lacking in the plant: 


You need not be an expert farmer or gardener to know these, as this is not rocket science. These are just simple gardening tricks and gardening tips that you need to know. 

Signs in the leaves and what do they indicate: 


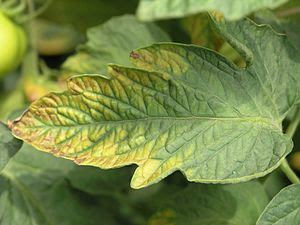
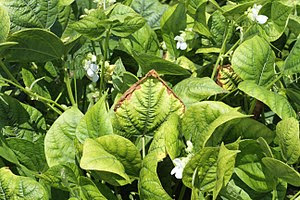
First we will see certain signs in leaves and will see which nutrient deficiency causes these signs, so that we can supply the plant with those specific nutrients. Check out for brown spots in the leaves especially in the edges, yellowing of veins, yellow edges and brown veins. 

Browning of leaves


In addition to these signs curling of leaves, purple spots under the leaves should also be looked for. Mostly these deficiency symptoms will begin to appear in older leaves. 


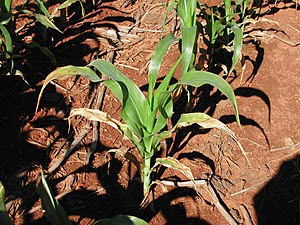
Browning of leaf tips

Brown Leaf tips


What happens if these signs are left unnoticed: 


This when left unnoticed will lead to overall reduction in plant growth including reduced root development, seed and fruit development. If you notice any of these or most of these symptoms then it is definitely due to potassium deficiency. Potassium is the 3rd most important nutrient required by plants. 

Potassium deficiency and plant diseases:


Moreover, potassium deficiency will lead to more diseases in plants, this is because the thickening of cell walls in plants will not happen properly. This is because when adequate amount of potassium is present, silica will be accumulated and incorporated into the cell wall thus strengthening the cell wall which functions as a physical barrier to the pathogens which cause plant diseases. So now let's see what we can do to increase the level of potassium. We will look into certain natural sources of potassium. 

Natural sources of potassium: 


Seaweed, wood ash, crop residue, manures, kelp meal, green sand (which can be got in the nursery), fruit peel fertilizer - especially banana peel fertilizer and coffee grounds. 

Wood ash

Green sand as fertilizer for plants

Kelp meal as plant fertilizer

Seaweed as plant fertilizer


Related Posts